Tuesday, December 11, 2007

j'aime le potage


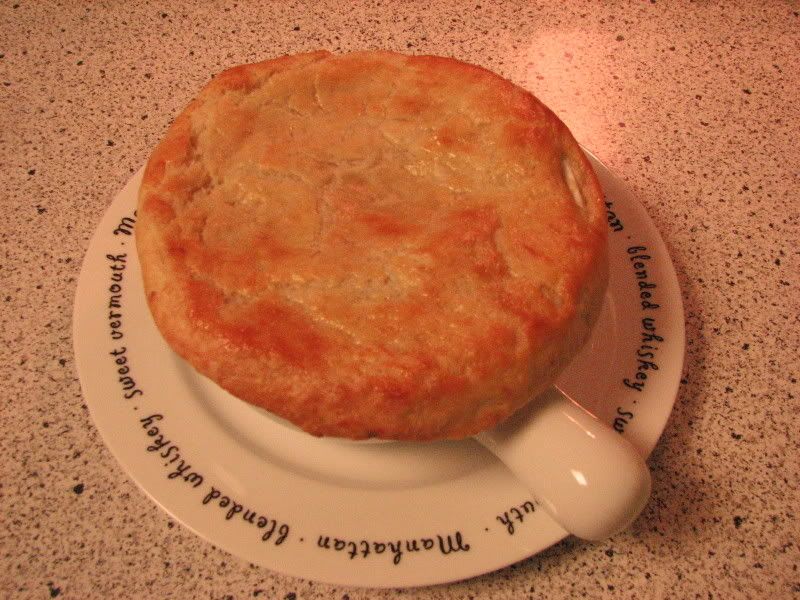
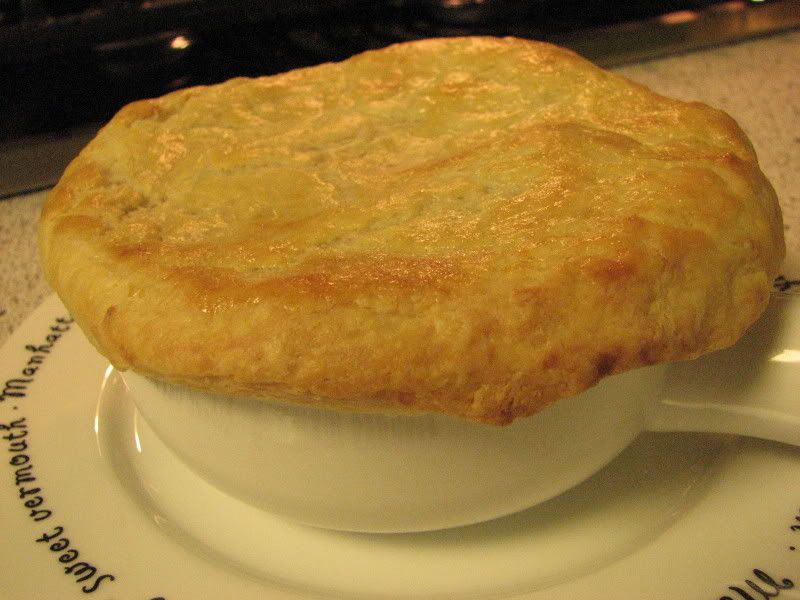
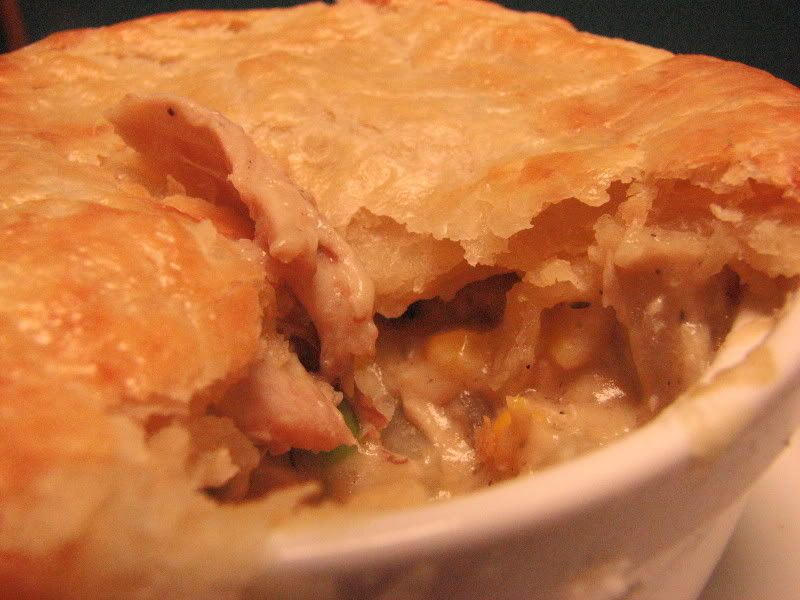
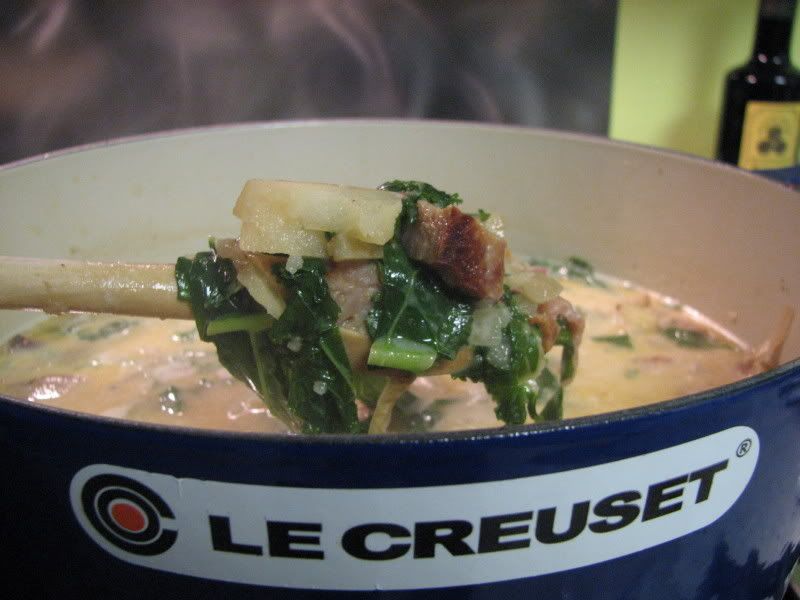
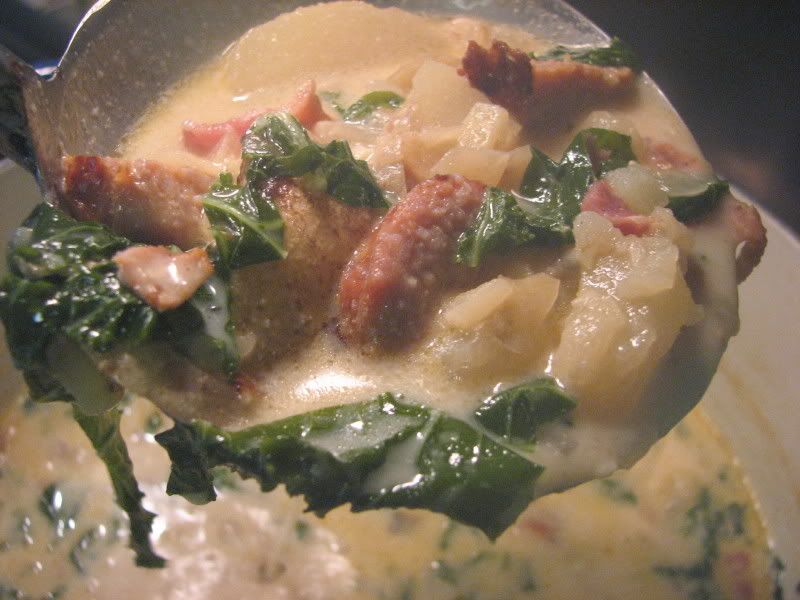
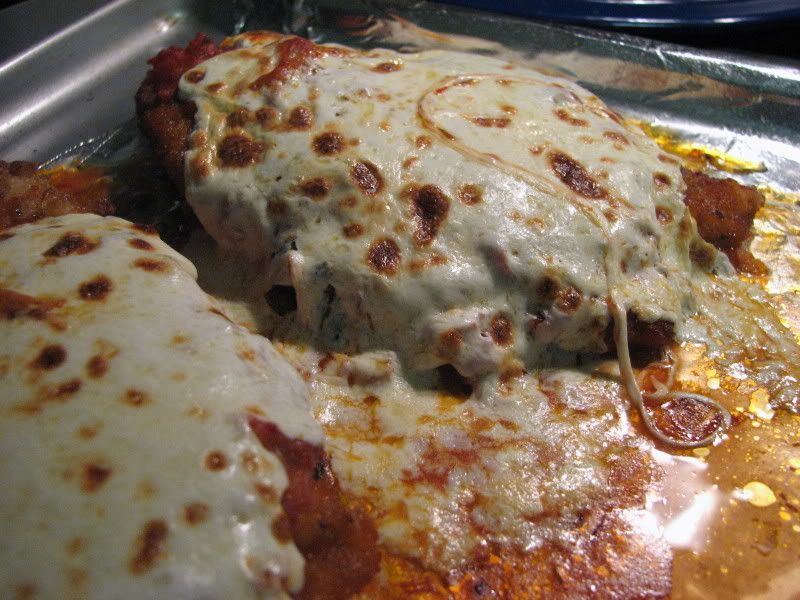
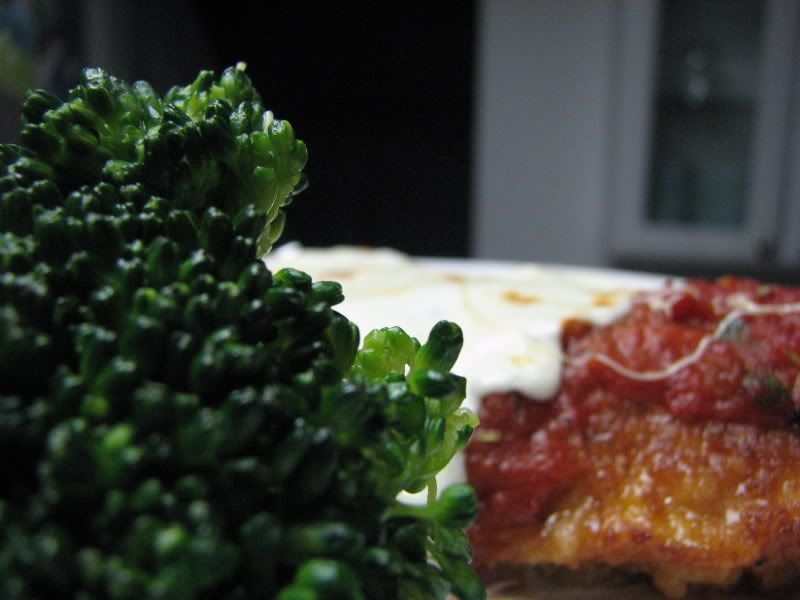
I’ve always loved French Onion Soup….there’s not much I can say about this because it is so perfect in its simplicity….fitting, since I found and modified this from the French onion soup I found on simply recipes…one of my favorite food blogs…these pictures are also some of my favorite food pictures, so I will let them do all the talking. There’s no language sweeter than that of cheese…..

French Onion Soup

6-8 large yellow onions, peeled and thinly sliced.
Olive oil
pinch of sugar
2 cloves garlic, minced
8 cups of beef stock (approximately)
1/2 cup of whatever dry white wine you happen to be drinking while you are cooking…what? You don’t drink when you cook? We can no longer be friends.
1/4 teaspoon of dry thyme
2 bay leaves
Salt and pepper
a bunch of slices of toasted French bread
sliced swiss or gruyere cheese

If you’re naughty like me, “toasting” the French bread = slicing an entire baguette, brushing it with olive oil and sprinkling it with a little garlic powder and some salt and pepper and then toasting the slices on a cookie sheet in the oven on about 350 for 15 minutes or so…..so do that and while that is happening, start your soup. Then the oven will be nice and warm for your soup when you’re ready….

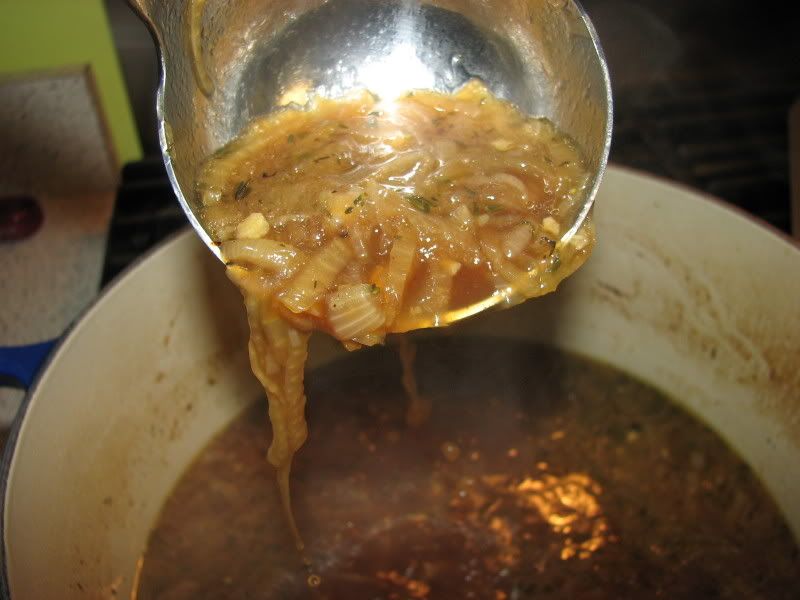
1. now take ALL of your onions….you will be crying and it will seem like “oh my god, this is way too many onions!” but it’s not…..put them in a large soup pot or dutch oven over medium high heat with about 2-3T of olive oil in the bottom and just let them cook and cook, stirring occasionally. After about 15 minutes, sprinkle about ½ teaspoon of sugar on them…..this should take about a good 30 minutes or more. You should know when they are ready…they’ll be all dark brown and soft and gorgeous!
2. add the garlic, sauté for about 3 minutes (there is no better smell in the world!)
3. add the wine and scrape up the little bits from the bottom of the pan with a whsk.
4. add the bay leaves, beef stock and thyme and bring it to a heavy simmer. Let that just go happily simmering for awhile….as long as you want, really, but no less than 30 minutes.


5. discard bay leaf and season with salt and pepper
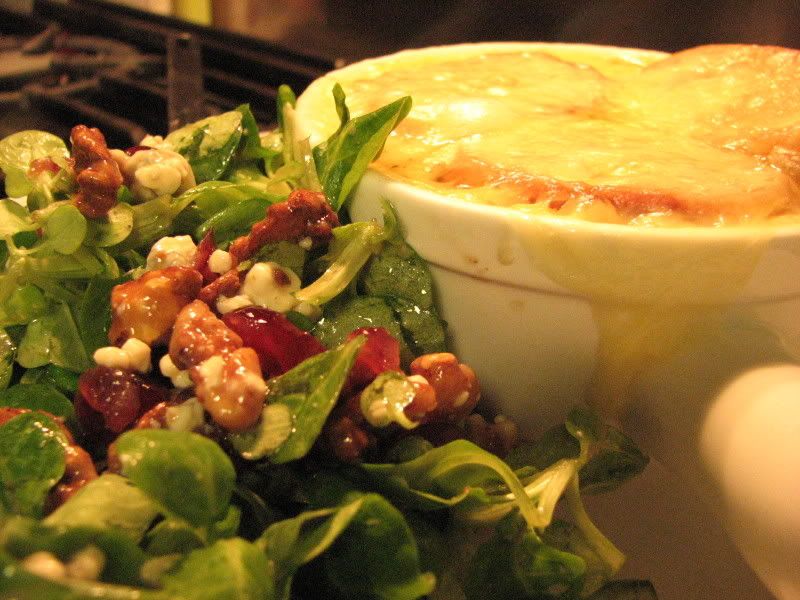
6. ladle the soup into oven safe crocks and top with enough French bread to cover the top of the soup. Most recipes say to just use a slice, but my baguette was small, so I used three.


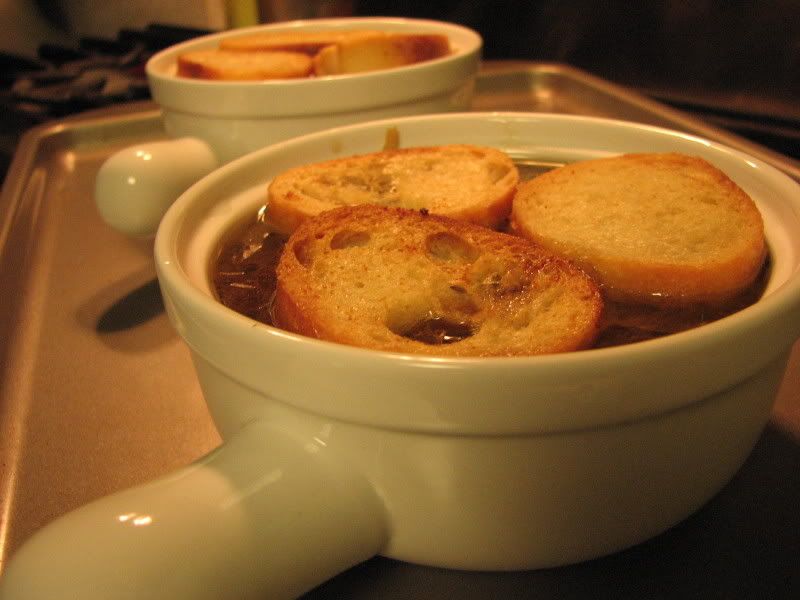
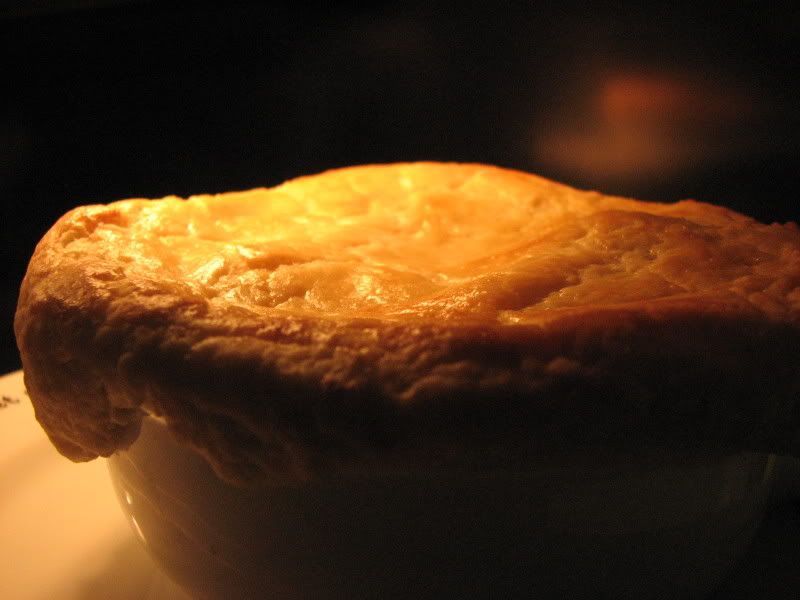
7. top the toasts with slices of swiss or gruyere. You can use shredded too, and a little parmesan if you want, but I prefer slices. Let a little hang over the side because everyone knows that the cheese that gets crusty and sticks to the side of the bowl is the best part.
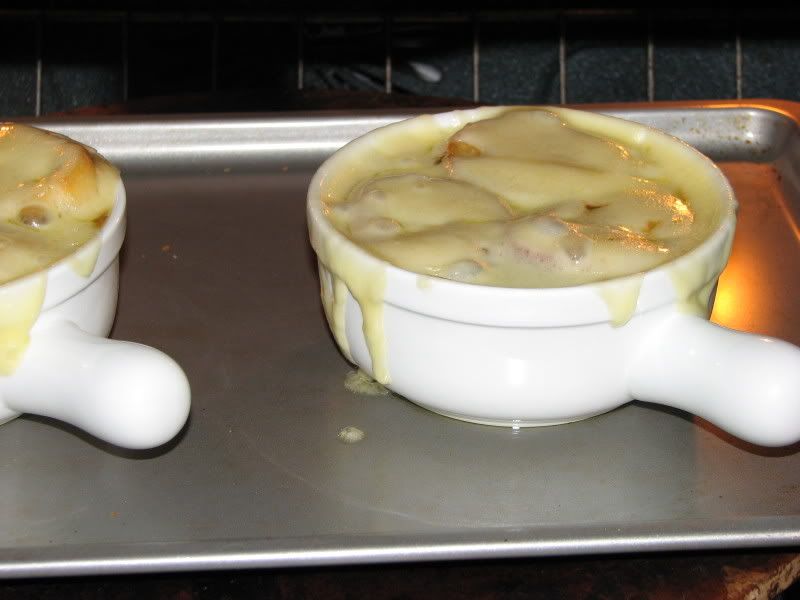
8. stick the crocks on a baking sheet and put them in a 350 oven for 10 minutes or so until the cheese is browned and bubbly on top. You can use the broiler for a minute to help it out of you want.


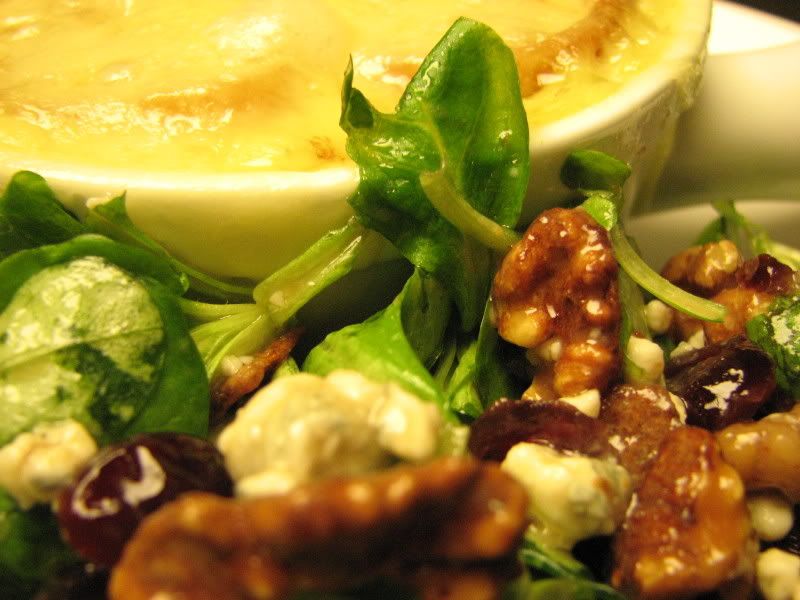
9. I served mine with the best salad ever……this soup is amazing!! Enjoy!

Thursday, December 6, 2007

getting the hang of this pie thing...


I’ve always loved chicken pot pie. When I was little, we used to have the swanson frozen ones and it used to frustrate the hell out of me that it took 57 minutes for them to cook in the oven. The idea of making one from scratch never occurred to me until just recently and at that point, it became more of an obsession than an idea, but that’s just how I roll.


When I saw this gorgeous thing on Confections of a Foodie Bride I knew I had to make it immediately…as usual, I changed it up a bit and omitted a few things and added a few others, but the crust is the star of this show…..i am SO disappointed that I had my camera set to the wrong resolution because the flaky layers are not done justice in these grainy photographs. This, my friends, is comfort food at its finest….with my newly acquired expertise in all things pastry dough (ha!) and at just over an hour from start to finish if you prep your chicken beforehand, swanson can eat their heart out….it’s like the difference between a gorton’s fish stick and dayboat, cedar planked, maple glazed wild Alaskan salmon.


mmmmm…..now I want salmon…..


Chicken Pot Pie

For the filling:
About 3 T butter, or EVOO or a combo. I used butter.
1/2 – 1 whole medium yellow onion, chopped
1 shallot, chopped
1 stick of celery, chopped
1 carrot, peeled and chopped
1 russet potato, peeled and chopped
3 cloves garlic, minced
About ¾ cup sliced baby portobella or white mushrooms
Approx 1 tsp. dried sage
Approx ½ tsp crushed red pepper flake
Some frozen peas (1 cup? Half a cup? Whatever)
Some frozen corn
1 whole cooked rotisserie chicken or 4-6 cooked breasts, meat shredded or chopped.
Salt and pepper

For the cream sauce:
1 stick of butter (yikes)
1 cup flour
2 ½ cups of chicken broth
½ cup light cream (or whole milk)
A few shakes of franks red hot (I was out of Tabasco)
Salt and pepper

For the crust
( I made half a batch, but this is the full recipe)
2 sticks of cold butter cut into pieces
3 cups of flour
10 oz. chilled cream cheese, cut into pieces
Salt
Pepper
Ice water (6-8 TBS)
1 egg, beaten


1. get the chicken cooked and shredded way ahead of time. I bought a rotisserie chicken at the market, shredded it and left it in the fridge until yesterday. It made my life infinitely easier.
2. in a really big sauté pan, melt the butter for the filling and sauté the onions, celery, shallot and carrot over medium heat until they’re softened. About 4 minutes.
3. add chopped potato, garlic and mushrooms and continue to sauté for at least 15 minutes. You don’t have to babysit it, just remember to stir it around every minute or so.
4. once the 15 minutes have passed, add your thyme, crushed red pepper, salt, pepper, corn, peas and chicken and turn the heat down to low. Stir it all around for a minute or two to combine everything and heat the chicken through. Now taste it to make sure it’s yummy and set it on the back burner until you’re done with the sauce.
5. Meanwhile, get out your sauce pot and get the stuff ready for your cream sauce. The sauce needs constant attention so if you’re not adept at doing two things at once, you might want to finish the filling part first and then focus all of your attention on the sauce.
6. melt the stick (or sticks if you are doing the whole recipe) of butter in the saucepan and, with your whisk in one hand ready to go, add the flour to the butter. It is going to gob up and clump together so make sure your heat is not up too high. Medium low for right now should be fine. You don’t want the flour to burn. Keep stirring it with the whish and getting the globs out and mashing them around for about a minute or two. Then add the chicken broth and milk or cream and whisk whisk whisk. Turn the heat up to medium. This will start to thicken pretty quickly, just keep whisking. Add the hot sauce, salt and pepper and taste it to make sure it’s right. You want the consistency to be thicker than chowder, but not as thick as a cheese sauce. Maybe 4 minutes?
7. Add the cream sauce to the chicken veggie filling. I told you you would need a big pan. Stir it all together.
8. Preheat oven to 375.
9. Now for the crust. Put the flour and butter in a food processor and pulse until it is crumbly. Maybe 20-25 1 second long pulses. Then add the cream cheese and pulse some more till that is crumbly. Add a little salt and pepper when you add the cream cheese. Now, through the feed tube at the top, add ice water about 2 TBS at a time and pulse. After about the 4th or 5th addition, it will start to glob together and make a ball. You don’t want it too wet, so when it just starts to stick together, take the lid off and form it into a ball. I would recommend actually preparing the crust a few hours ahead and letting it chill like this because it was a little sticky to roll out…
10. Take your ball and plop it on a floured surface. Flour your rolling pin and roll the crust out into a big circle. If you are using individual bowls, invert one of them in the dough and cut around it, making the circle about a ½ - 1’’ bigger than the bowl. Do this for however many you are making. If you are using a casserole dish, do the same thing.
11. Fill your dishes or casserole with the creamy chicken filling and then carefully lay the dough circles on top, letting the edges flop over the dish and pushing them against the outside to keep the filling all snuggly inside. Brush the tops with the beaten egg and put the dishes on a cookie sheet.
12. Put the cookie sheet in the oven and bake for 25 minutes until the crust is the most gorgeous golden brown color you have ever seen.
13. Die happy.

by the way...this really creates a hell of a lot of dishes...

Friday, November 23, 2007

easy as pie


I don’t know where this ubiquitous little quip came from because let me tell you something…this weekend I learned in no uncertain terms that pie is NOT easy. It’s not hard like I might imagine, say, an osso buco would be. I’ve never made an osso buco, so I can’t say for sure which is more difficult, but just the thought of osso buco has always intimidated me. Much like pie crust from scratch used to intimidate me. Pastry chefs with cookbooks and food bloggers the world over put the fear of God in you regarding the temperature of your butter, the precise size of your flour covered butter peas, the steadfastness with which you MUST blend or risk being proven the complete pie making failure you are terrified you might actually be, butter and shortening? Just butter? Just shortening? Chill! Chill! CHILL!! HOW MANY TABLESPOONS OF ICE WATER?!?!

I made my virgin voyage to the land of pate brisee on Tuesday night. Apple pie is in my blood which is probably another reason I was so afraid to mess it up. If my pies weren’t perfect from the word “go”, Grandma Martha up in Heaven would surely find out about it and be ashamed to call me her own. So with a fiery determination (though not too fiery….i had to make sure the butter stayed cold!) I bravely forged ahead.

My major fear was in the butter/shortening. I had to make sure it was cold enough. I knew that if my pie was a failure, it would be because my fat was not cold enough…so I froze it. In retrospect, that might not have been the smartest thing to do when cutting the butter by hand rather than with a food processor, but we live and learn. I was sure I added 1 tablespoon too much water…with the last addition, there was a smooshy slurp sound in the bowl and I almost started to cry. “I can’t add more flour now! The crust will be tough (whatever that means!)! there’s no turning back. I $*&%ed it up. I’m an apple pie dunce!! I’m throwing in my apron!!” (I’ve been called a “passionate sort” by one of the people who know me best…). I wrapped it in Saran, mooshed it into discs and put it in the fridge, fighting tears. Tuesday night, I dreamt of the perils of a sticky, overly wet dough.

Wednesday, I peeled and cored 7 apples with a paring knife (Dear Santa, an apple peeler corer would be an awesome gift. I’ve been good, albeit a little dramatic. Have a cookie. Love, Rachel), rolled out my CHILLED dough between 2 pieces of wax paper and nearly cried, again, when it was sticking as I was trying to get it in the pie plate. It was totally stressful mainly because when it comes to food and pie in particular, I’m a perfectionist.

Like a mother with her first newborn, when that pie came out of the oven, golden and flaky looking, dripping hot cinnamon apple gooeyness onto the floor of my oven, perfect in all of its lopsided imperfection, I was overwhelmed with pride. It was perfect and I had done it. Grandma is proud.

Apple Pie

For the crust:
2 ¾ cups unbleached, all purpose flour
1 stick + 2 TBS of super chilled, unsalted, good quality butter, cut into ½’’ pieces
10 TBS. of super chilled or frozen Crisco, cut into ½’’ pieces
1 tsp salt
2-3 TBS sugar
6ish TBS ice water

Mix the flour, sugar and salt in a bowl, add the butter and cut into the flour mixture using a pastry blender until crumbs are pea sized. Add the Crisco and continue to blend. Add the ice water 1 TBS at a time, folding it in with a fork until it barely holds together. (don’t mix like cookie dough. Be gentle) Separate in half and wrap each half in Saran, form them into discs and chill overnight.

For the filling:
3-4 granny smith apples, peeled and cored, 1’’dice
3-4 mcintosh apples, peeled and cored, 1’’ dice
(This combo of apples is great because the mcintosh break down and turn to an applesauce consistency while the granny smith keep their shape somewhat)
Lemon juice (on the cut apples to keep them from turning brown)
Brown sugar (about ½ cup)
White sugar (about ½ cup)
Cinnamon (maybe 2 tsp)
Nutmeg (a pinch)
Cornstarch (about 3TBS)

Mix the dry ingredients well and set aside.
Roll out one disc of dough on a well floured surface or between 2 pieces of saran or wax paper, starting from the center and pressing outward, keeping the round shape. Get this dough into your pie dish whichever way is the easiest and most comfortable for you. Some people prefer to roll it onto their rolling pin and transfer it that way. I am not that adept yet. I am a bit of a spaz so I peeled off the top layer of wax paper and then did a flip and peeled off the bottom layer of wax paper which was now right side up. It stuck a little. I freaked out, but it all worked out in the end. Push the dough gently into the sides of the dish and let the extra dough hang over.

Now dot the bottom of the dough with a few pats of butter, 1/3 of the apples, a sprinkling of the sugar mixture, another 1/3 of apples, more sugar, the rest of the apples, the rest of the sugar and some more pats of butter. Roll out your top crust the same way you rolled out the first and carefully transfer it to the top of the pie. Centering it proved difficult or me, but it wasn’t a disaster. Now fold the bottom flap of dough over the top flap and roll it up to make the edge. Make it pretty by using your index and middle finger of one hand and knuckle of your thumb on the other hand to make a wavy pattern around the edge.

Vent the top so it doesn’t explode, sprinkle with sugar and bake for 50 minutes on 400.
About 20 minutes in, cover the pretty, wavy edge of your crust with foil or a pie ring.

Do yourself a favor and throw a piece of foil on the bottom rack of your oven when you cover the crust edge. The filling will inevitable bubble over and cleaning it off the bottom of your oven is no picnic.

Kiss yourself. Your grandma is proud.

Wednesday, November 7, 2007

Staring Winter in the face


I’ve really been into the soup lately and I am loving every minute of it! I’m not gonna lie….I’m not a fan of the cold weather, even if with it comes the promise of an exquisite palette of sunset colored, softly falling leaves, fluffy, dancing snowflakes and Christmas scented Yankee candles. I’m a California girl. To me, Christmas means the temp drops to 50 and I am bundled up in cashmere scarves and wool coats. Here in New York, on my 4th real winter, they are still laughing at me and I am suffering for it….6 months out of the year, I am suffering….my only respite is finding things to cook that would be downright insane to cook in the sweltering, oppressive humidity of August. Lately, I have been distracting myself from the bitter cold (which the NY weathermen are still calling “mild”….thick blooded freaks…) by medicating myself with a plethora of rich, hearty soups and chocolate chip cookies from scratch….all in the name of winter insulation!

This chicken corn chowder, the recipe for which I found by doing a simple google search, turned out to be an immediate winner….a recipe I will make for years and years that I hope to be remembered by when I’m gone. It was THAT good. As with every recipe, I changed it a little by deglazing the pan with white wine. I also think that taking the extra effort to roast your own chicken makes all the difference in the world. I had never roasted a chicken before and I found it to be one of the easiest things I have ever done. The meat was so tender it practically melted in your mouth! It takes some thinking ahead, but the end result will warm your bones right through to April. Enjoy!


Old-Fashioned Pawtucket Chicken Chowder
Adapted from The LL Bean Book of "New" New England Cookery

4 tablespoons vegetable oil
1 onion, diced
2 to 3 ribs celery, peeled and diced
2 to 3 potatoes, peeled and diced
2 tablespoons chopped parsley
½ cup dry white wine
2 tablespoons flour
1 cup light cream
2 cups chicken broth
2 cups cooked chicken, diced (I used the meat from a whole roasted chicken, shredded.)
salt
fresh ground pepper
1 cup corn kernels (fresh or frozen)

Heat vegetable oil in a large pot and stir in the onion and celery, continuing to stir for about 5 minutes, before adding the potatoes. Cover and cook over low heat for about 10 minutes, and stir in the herbs. Push the vegetable off to the side and deglaze the pan with the white wine. Mix the flour with milk to make a thin paste, then add the milk and broth to the soup pot and bring to a boil. Simmer until the vegetables are tender but not mushy. Stir in the chicken and optional corn, and sprinkle lightly with salt and pepper to taste. Cook gently 5 minutes; serve hot.
I served mine with a decadent loaf of French bread that I had spread with softened butter, sprinkled with garlic powder and toasted in the oven, wrapped in foil for about 30 minutes. It was the PERFECT, indulgent accompaniment. I cannot wait to make this soup again!

Monday, November 5, 2007

Flashbacks...


I’ve been making a lot of my mom’s recipes lately and am amazed each time one comes out tasting exactly how I remembered it tasting when she made it. She used to make this Chinese chicken salad for all of her potluck work parties and I would get so exhausted watching her meticulously shredding the green onions. She was always so proud that there was never any left and people used to just hover around the bowl taking 2nd and 3rd helpings. She was meticulous about everything, and it really was such a precious quality…of course as a bratty 16 year old, I just wanted her to hurry up…every ounce of effort this salad takes to make is worth it. I know that shredding the green onions doesn’t make them taste differently, but there is something about the different texture that is just the right fit. The dressing is out of this world and the little notes my mom wrote on her recipe say “make extra! you’ll be glad you did!” and I did and you will. This recipe makes enough salad to feed a small country so it’s great for a party, but if you’re not feeding an army, you can half it. I would still make the extra dressing though if I were you…mom said to!

Harriet’s Chinese Chicken Salad


1 head of cabbage, shredded
2 bunches of green onions, shredded into matchsticks (this takes forever to do, but it must be done…..the salad is just not the same with round little slices of onion)
1 box of frozen petite peas, thawed
6-8 chicken breasts, cooked and chopped into 1’’ or so pieces
3 packages of ramen noodles, uncooked and broken up. Flavoring packages discarded.

Dressing
6 T soy sauce
6 T rice vinegar
3 T sesame oil
2 tsp. Sugar
¼ cup vegetable oil

Thursday, October 25, 2007

Perfect Soup Weather


I’ve been on a real soup kick lately and my beloved dutch oven and I have been having a ball! I found this recipe for Zuppa Toscana months and months ago, printed it out while drooling on it and then stuffed it in a folder and quickly forgot about it. Now as far as I’m concerned, this soup is the only way I could ever justify going to Olive garden…


Fall is in the air here in beautiful Long Island (*snark*) and there’s nothing more comforting that a hot bowl of homemade soup. I stumbled back upon this recipe last week and got so inspired that I planned a whole week’s menu around soup, soup and more soup! Specifically, soup, chili and chowder. It has been one DELICIOUS week!


This came out amazing and there are only a few changes I will make next time. It’s supposed to be a copycat recipe, but for some reason, they have the sausage in links and then sliced when the original has crumbled bits of sausage. I couldn’t find small spicy links that weren’t breakfast sausage, so I used 6 big Italian spicy sausages instead. I flirted with the idea of taking them out of their casing and browning them in the pot but wanted to follow the recipe exactly the first time. While it was still delightful, next time I will try it with the crumbled sausage. Not only will it speed up the cooking time (roasting the sausage in the oven seemed like a ridiculous waste of time), it will also add another layer of browned bits to the bottom of the pan, and I think we all agree, you can never have too many browned bits!

On with the show!


Olive Garden Zuppa Toscana

Recipe from CDKitchen.com

12 small spicy sausage links
2 medium potatoes, cut in half lengthwise, and then cut into 1/4" slices
3/4 cup onions, diced
6 slices bacon
1 1/2 teaspoon minced garlic
2 cups kale leaves, cut in half, then sliced
2 tablespoons chicken base
1 qt. water
1/3 cup heavy whipping cream

Preheat oven to 300 degrees. Place sausage links onto a sheet pan and bake for 25 minutes, or until done; cut in half length-wise, then cut at an angle into 1/2 inch slices.

Place onions and bacon in a large saucepan and cook over medium heat until onions are almost clear. Remove bacon and crumble. Add garlic to the onions and cook an additional 1-minute. Add chicken base, water, and potatoes, simmer 15 minutes. Add crumbled bacon, sausage, kale and cream. Simmer 4 minutes and serve.

Wednesday, October 17, 2007

Tuna Melt Nostalgia


Sometimes, the simplest things are the best things. One of those kinds of times is when, even after a month of living in your new home, your living room still looks like a bomb went off and you have completely lost that lovin’ feelin’. I’m 100% burnt out. I really hope I get my mojo back soon because there are 6 rooms that need painting and a whole living room and guest bedroom AND office to furnish, not to mention all of my plants are dying and I can’t decide if that is because it is Autumn or if it’s because they hate me.

So, I started thinking of the good old days back in California before I had 2 mortgages and had never once given a thought as to whether Benjamin Moore paint was really worth the extra bucks and whether I’m supposed to put the darker color above or below the chair rail. There was a burger place across the street from Glendale Community College whose name now escapes me but whose tuna melts I will never forget….I needed comfort, so I pulled out my Panini press (which changed my life, by the way.) and went to work…

Even my brand spankin’ new world’s most beautiful oven doesn’t turn out a crispy pre-frozen French fry…I figure I must be doing something wrong, but what it is I have no clue. My next life changing appliance purchase is going to be a mini deep fryer for things like this and my for daddy’s crab puffs and sweet & sour pork….


Tuna Melts

For the tuna salad:
2 cans solid white Albacore Tuna in water
½ cup chopped seedless cucumber
I stalk celery, chopped
Some flat leaf parsley, chopped
1 T dijon mustard
¼ C or more (to taste) low fat mayo
Salt, pepper
(I never make my tuna salad the same way twice. This is a standard recipe and I throw in whatever else I find in the fridge…capers are good, and sometimes I replace the cucumbers with chopped dill pickles…YUM!)

4 slices of fresh from the bakery, sourdough bread, slathered on one side with softened butter
Tomato slices
Thick slices of cheddar cheese


This sandwich is easy as pie….just put 2 slices of bread butter side down on a cutting board and build up…cheddar, tuna, tomato, cheddar and then the other slice of bread, butter side up on top. Toast them in your Panini press, or in a non-stick skillet over medium heat until the cheese is all drippy and melty and the bread is crunchy and golden brown.

Don’t serve it with soggy fries like I did.

Wednesday, October 3, 2007

cooking in my new kitchen!


The last 4 weeks have been completely consumed with all things moving. There are both good and bad things about being able to take your time moving from one place to another...one of the worst obviously being that pesky double mortgage thing, but also simply that the more time you have, the more you take and things tend to get drawn out...blogs tend to get neglected, you tend to eat 20 frozen topp's hamburgers on the grill in 1 week with ketchup flavored potato chips on the side because you can't find your friggin' wok...things like that....

My new oven, however, makes me so positively gleeful I think I might never want to eat out again! If it weren't for the lack of a dishwasher in our new house (how bizarre), I could gaurantee that! It is a gorgeous and substantial kitchenaid stainless beauty and everything comes out as if angels were inside of it just whistling and dancing on the food. It makes me want to sing! What makes my husband want to sing, however, is chicken parmesan....he loves it. Obsessed to the point it is sort of a joke with his friends. We go out for Chinese and they ask "what are you ordering Scott? A chicken parm hero?" I had never attempted to make it before but it seemed fairly simple so I gave it a shot...I glanced at a few recipes on the web and decided just to wing it and I'm glad I did....this was the best thing I have made in a long time!

Enjoy!


Scotty’s Favorite Chicken Parmesan

For the chicken:
4 chicken breast cutlets, about 6 oz. each.
Flour, salt & pepper
2 eggs, beaten with about 2T water
Italian breadcrumbs
Grated parmesan cheese
Half a ball of sliced, fresh mozzarella (please don’t use polly-o)

For the sauce:
1 large can crushed tomatoes
1 small can tomato sauce
3 cloves garlic, minced
½ yellow or white onion, minced
1T dried oregano
½ T dried rosemary
Pinch of crushed red pepper
About ¾ cup of chiffonade or torn basil leaves
Olive oil

Sauté garlic and onions in olive oil until fragrant and onions are translucent. Add oregano, rosemary and crushed red pepper and both cans of tomatoes. Simmer over medium heat for about 10 minutes and then stir in basil and season to taste with salt and pepper. Let the sauce continue to simmer over low heat while you prepare the chicken.

Preheat oven to 350

Set up a cookie sheet or sheet pan covered in foil and sprayed with nonstick cooking spray next to the stove.

Set up 3 bowls or casserole dishes. One with flour, salt & pepper combined, one with the egg and water mixture and one with the bread crumbs and parmesan cheese.

In a large sauté pan or nonstick skillet, heat about ¼ cup olive oil over medium high heat until it shimmers. One at a time and working in batches so as not to crown the pan (I did 2 at a time), dip each cutlet first in the flour mixture, then the egg mixture and then the breadcrumbs making sure to thoroughly coat with each layer even if it means pressing the chicken into the mixture, and fry about 3 minutes on each side or until the breading is golden and crispy. Move cutlets to sheet pan and top with more grated parmesan, 1 ladle of sauce and a thick slice of mozzarella cheese. Bake for 15 minutes and then switch to broil for 5 minutes more until cheese is golden and bubbly. Serve with buttered pasta or veggies…we chose broccoli. Yum!

Thursday, August 30, 2007

a quiche is just a quiche...

unless it is Giada's quiche...for a skinny bitch, she sure knows her way around a pie shell and some heavy cream...
I've made this little monster twice...the first time I followed the recipe to a "t". The original calls for salt...once or twice, I have actually considered buying one of those salt licks they make for horses and just setting it up beside the couch, so if there's anyone who can tolerate a salty dish, it's me, but considering all the pancetta, I have to say Giada made a bad call. It was edible, but really, and I mean REALLY salty. coming from me, that's saying a lot.


I switched things up a bit this time due to not having any pancetta laying around...I used regular bacon for the pancetta, shredded mozzarella for the parmesan and half & half for the heavy cream and NO ADDITIONAL SALT. It was absolutely delish!!! I even had the leftovers last night with a big salad...my hubs didn't think it reheated all the well, but it was quichable to me!! enjoy!


Giada's Pancetta and Parmesan Torte

1 refrigerated pie crust (half of 15-ounce package), room temperature
1 teaspoon olive oil
4 ounces thinly sliced pancetta, chopped
2/3 cup whipping cream
1/2 cup whole milk
3 large eggs
3 tablespoons finely chopped fresh Italian parsley leaves
1/4 teaspoon salt
1/4 teaspoon freshly ground black pepper
2/3 cup shredded Parmesan

Position the rack on the bottom third of the oven and preheat the oven to 400 degrees F.
Press the crust into a 9-inch-diameter tart pan with a removable bottom. Trim the edges; set aside.

Heat the oil in a heavy medium skillet over medium heat. Add the pancetta and saute until crisp, about 7 minutes. Using a slotted spoon, transfer the pancetta to paper towels and drain. Beat the cream, milk, eggs, parsley, salt, and pepper in a medium bowl to blend. Stir in the cheese and pancetta. Pour the cream mixture into the crust.

Bake the torte until the filling puffs and is golden brown on top, about 25 minutes. Let the torte cool for 15 minutes. Cut the torte into 12 thin wedges and serve.

Sunday, August 26, 2007

less is more...


There used to be a restaurant called Crocodile Cafe...I have no idea if it still exists, but one thing i do know is that my first dance with the gloriousness that is watercress happened right there on Lake Avenue in Pasadena, California. You really don't get the opportunity to have watercress very often. It's a very underestimated little vegetable. Is it even actually a vegetable?

I've been thinking about the sandwich i always used to have there since the last time I had it which has to have been over 5 years ago. The watercress at the market looked extra happy, green and fresh last week so I decided to take matters into my own hands and try to recreate the masterpiece. I think I did an exceptional job...This little yummy looks simple, and it is, but that is what makes it so good. Take the time to roast the chicken, toast the bread, make homeade mayoniase if you can and by all means, stuff as much watercress on this thing as you can fit....how often to you really get the opportunity?


Roasted Chicken Sandwich with Watercress
1 whole chicken breast, split, on the bone with skin
1/2 - 1 cup chicken broth and/or white wine
1/2 a stick of butter
1 lemon
2 T olive oil
sea salt & fresh pepper
any combination of italian herbs...rosemary, oregano, basil, thyme etc. (I just used the little packet of spices they gave me with my takeout from Carraba's the other night that I was supposed to mix with oil and use for dipping bread...)
2 cloves of garlic
1 white onion
1 whole french or italian baguette, split legthwise and cut into 2 pieces
mayonaise (homeade is preferrable, but hellman's will do just fine)
1 bunch of fresh watercress

preheat oven to 350
rinse chicken breasts in cold water
place chicken breasts in an oven safe pan, skin side up (pyrex is my favorite. I cannot live without my pyrex)
wash your hands
pour chicken broth and/or wine in the bottom of the pan with the chicken
season the breasts with salt and pepper, sprinkle with the herbs
zest 1 whole lemon over the breasts and then squeeze the juice onto them
smash the garlic cloves and just lay one on top of each breast
chop the onion into big hunks and add it to the pan
drizzle with olive oil
cut butter into chunks and set them right on top of the breasts


stick those bad boys in the oven for 1 hour and 15 minutes. every once in awhile, baste the chicken with the broth/wine/juice combo.

meanwhile, wash your watercress and cut off their long stems.

when the chicken is done and cooled enough to touch, peel the skin back and pull the meat off the bone into chunks and shred them a bit, but not too much.

drizzle your baguettes with a little olive oil and stick them in the broiler to toast untill golden, then remove them, and spread each half with mayonaise. don't be skimpy, this is not a virtuous sandwich.

assemble the sandwiches by placing a huge handful of watercress on the top half and a bunch of roasted chicken on the bottom and then smoosh the halves together and enjoyyyyyyyyyy!!!

when you go back to the kitchen to put the dishes away, and you notice there are some pieces of chicken still on the bone that you didn't get, and the onion chunks are just sitting there all carmelized and luscious looking in the pan with the delicious juice that the chicken was sitting in, under no circumstances should you resist gobbling those little bits up. while the sandwich is unbelievably delicious, the carmelized onions and leftover chicken bits soaking in jus are the BEST part...

Wednesday, August 8, 2007

Remember me?


I am ashamed of myself. I am the world’s worst blogger. While I am usually not a fan of the excuse, it just so happens I have a great one. One of the best I can imagine actually. Now that I think of it, I actually have TWO of them, though the 2nd one I thought of is pretty pathetic, but I can tie it into the first one and make it really swell if you give me a second! I’d like to take this opportunity to blame my lack of updates on the fact that in the 30 some odd days since my last post, we have bought a new house (though we are still awaiting a closing date), put our apartment on the market and been to Mexico and back for our much anticipated, very delayed and FREAKISHLY hot honeymoon. All of this activity has not afforded me many opportunities to grocery shop, let alone cook. Plus the heat, the need to use what’s in the pantry rather than lug it across town in the impending move and also, I’ve been putting off admitting this because I am so upset by it but, I kind of hate my new camera. I don’t know. It’s probably not the cameras fault and if I had a clue where the manual was and 30 seconds of free time, I might be able to figure out what I’m doing wrong, but my images are grainy, the shadows are terrible and I am unimpressed and just downright unhappy….phooey!

However, by popular demand and in the hopes of becoming inspired again, I present to you an offering from my archives….the prosciutto, fig and gorgonzola pizzette with basil chiffonade…if I close my eyes, I am still at the precious little wine bar in Raleigh in which I discovered this delicious little nugget with my BFF….i made a few changes to their creation and wish that I hadn’t so the next time I make these, I will go by the book…or rather, by the made up recipe in my head that I am pretty sure is similar to what they used.

A little brght twinkle on the horizon is my newest venture: pies! I’m very excited about this ever since falling head over heels for a strawberry rhubarb number in last month’s F&W. however, turning on the oven when it’s 94 degrees out and the humidity is more or less just a sea of water SUSPENDED in the air is a less than thrilling thought, especially if you ask my hair, so I’m waiting for the first crisp day of fall and I will hit the ground running. I will have to give up my rhubarb, I know, but apples are really my first true love anyway. That rhubarb thing was just a crush. I’m a pretty fickle chick….

Without further ado, I present the pizzette…


Prosciutto, Fig and Gorgonzola Pizette

Heat oven to 350
2 Pita rounds (the kind with the pockets)
Fig Jam
Basil, chiffonade (make a stack of basil leaves, roll them into a cigar and slice them crosswise to make little ribbons)
Prosciutto
Gorgonzola, crumbled
(*here is where my major change would take place. I used Gorgonzola because that’s what I had on hand. The originals used Cambazola, which was much milder and more melty. The Gorgonzola was still earth shatteringly delish, but I prefer the milder Cambazola)

Split the pita rounds lengthwise to make 4 round pieces.
Place the rounds smooth side down (the scratchy, inner, textured side up) on a baking sheet and stick them in the oven to crisp up for about 7 minutes or so.
Remove the rounds from the oven and let them cool until you can pick them up.
Spread each pita round generously with fig jam, top with prosciutto (about one thin slice per round) and sprinkle with cheese. Return the rounds to the oven for about 7 more minutes or until the cheese is melted and the prosciutto begins to crisp on the edges. Remove from the oven, cut each pizzette in 4 pieces, sprinkle with basil, pour yourself a glass of full bodied, oaky chardonnay and dig in……..

Wednesday, July 11, 2007

daddy's girl...

my dad is the best cook i have ever known. watching him cook my whole life, it has always seemed effortless. the way they say motzart was with the piano. i know that's a trite comparison, but it's very appropriate. when i was little, he invented some kind of chicken that i believe was stuffed with swiss cheese and some other combination of positively delectable things. i loved it so much, he named it "chicken rachel". pasta primavera, homemade chicken soup, filet mignon and lobster, chateau briand in puff pastry with little tiny , handmade, leaf shaped puff pastry accents on top and roasted baby root vegetables, roast beef and yorkshire pudding, vanilla bean creme brulee...and trumping them all, his mom's apple pie. one of my most frightening childhood memories was when i got caught one night, about 11 years old, crouching down in front of the refrigerator in the dark, fork in one hand, guilty look on my face, cheeks packed full of the apples i had so expertly and evenly (so as not to leave a trace) gobbled up, leaving a rim of empty pie shell. my daddy came around the corner and found me. it got ugly.

when my brothers are hungry (they're teenagers. they are always hungry), instead of asking "do you want to call domino's pizza?" he says things like "do you want me to fix you a chicken ceasar wrap?". bless his heart. this is my favorite of his impromptu snacks...the pictures i have taken don't do it justice.


my daddy's bbq chicken quesadillas

grilled chicken breasts, cutlets or tenders, chopped and cooled
burrito size flour tortillas
monterey jack cheese, shredded
jalepeno jack cheese, shredded
red onion, sliced thin
cilantro, chopped
honey bbq sauce (bottled is more than fine)

homemade guacamole is optional, but i always serve it with these because that's what my dad does. he makes his guac with chipotle tabasco, lime juice, cilantro, red onion, tomato and a tiny squirt of mayo. gives it a great, creamy consistency.

place a tortilla in a nonstick skillet over medium high heat. sprinkle with a combo of both cheeses and wait for it to start melting a little. then sprinkle half of the tortilla with the grilled chicken, cilantro and red onion. drizzle with bbq sauce, but not TOO much sauce, because these can get messy if you're too generous with the filling. once the tortilla is good and toasty and the cheese has fully melted, take a spatula and flip the side that only has cheese on it over on top of the filled side and press down like this:


remove, repeat untill you have as many as you want and cut each half circle into pieces and serve with guacamole and sour cream...these can also be kept warm in a 200 degree oven while you are working on the rest of them if you like. enjoy!!

Thursday, July 5, 2007

back with a vengeance.....


i've been away for longer than i expected to be and as predicted, have been suffering from cooking depression. it's cyclical...but nothing brings you back in the spirit quite like a batch of the world's most perfect cupcakes. i made these for my good friend michele's birthday and with the very first lick of the frosting covered beater, all was right with the world...i halved this recipe because i only own one muffin tin and because we weren't expecting an entire football team. the golden rule with these is: when you think you are done whipping the frosting, keep whipping. and i mean whip till your mixer is blue in the face. even after the 2nd time you think you must CERTAINLY be done for sure this time, still whip more. i'm talking at least 10 minutes of straight whipping. you'll thank me later...


From The Magnolia Bakery Cookbook

for the cakes:

traditional vanilla birthday cake

1 cup (2 sticks) unsalted butter, softened
2 cups sugar
4 large eggs at room temperature
1 1/2 cups self rising flour
1 1/4 cups all purpose flour
1 cup whole milk
1 teaspoon vanilla extract (do NOT use "imitation")(i subbed Madagascar Vanilla Bean Paste from Williams Sonoma and it rocked my world in this recipe...)

preheat oven to 350 degrees

line two 12 cup muffin tins with cupcake papers.

in a large bowl, on the medium speed of an electric mixer, cream the butter untill smooth (they say to do this for longer than you think necessary). add the sugar gradually and beat untill fluffy, about 3 minutes. add the eggs, one at a time, beating well after each addition and scraping down the sides of the bowl occasionally. combine the flours and add in four parts, alternating with the milk and vanilla extract, beating well after each addition.

spoon the batter into the cups about three-quarters full. bake untill the tops spring back when lightly touched, about 20-22 minutes. remove cupcakes from pans and cool completely on a rack before icing.

makes 24 cupcakes

for the icing:

traditional vanilla buttercream

1 cup (2 sticks) unsalted butter, very soft.
8 cups confectioners sugar
1/2 cup whole milk
2 teaspoons vanilla extract (do NOT se "imitation")(Madagascar Vanilla Bean Paste here as well)

place the butter in a large mixing bowl. add 4 cups of the sugar and then the milk and the vanilla extract. beat untill smooth and creamy. gradually add the remaining sugar, 1 cup at a time untill icing is thick enough to be of good spreading consistency (you may very wellnot need all the sugar). whip even longer to make it extra creamy. the longer you whip, the creamier it gets. if desired, add a few drops of food coloring and mix thoroughly. use and store icing at room temperature, as icing will set if chilled. can store in an airtight container up to three days.

Sunday, June 10, 2007

a sad hiatus...

so, i'm going to be a little sporadic about my blogging for a bit. we're on some kind of budget that apparently does not allow me to go to the market, even for milk and eggs, which we have none of....and i'm starting a new diet pill on friday so untill i adjust to these new changes, i'm going to be a little kitchen depressed. as always, if by some miracle, i create a life changing dish straight from my pantry, the blog will be the first to hear about it, but untill then, i'm going be eating stale crackers and the rest of the tub of cool whip free......

Wednesday, June 6, 2007

oh, stuff it!


thanks to a couple of the super talented ladies on a cooking forum i frequent, i have been craving a stuffed bell pepper something fierce lately...never having made one before, or even eaten one for that matter, i hardly knew where to start. it did seem, however that they could be simple, outrageously delish and lend themselves easily to any kind of flavors you happened to be craving....and most importantly, of course, they are SO cute all stuffed and perky and festively colorful! i called in for a little help, got some great ideas and inspiration and here is what i came up with...it was one of the best dinners i've made in awhile and the best part is, there are leftovers for tonight! yay!

Stuffed Southwest Peppers
4 large bell peppers, various colors, boiled for 3-4 minutes each just to soften slightly, tops cut off and reserved, seeds and ribs removed.
yellow spanish saffron rice, cooked according to package directions subbing chicken broth for water. about1 1/2 cups cooked.
1 T. unsalted butter
EVOO
1 yellow onion, chopped
2 cloves garlic, minced
1/4 cup salsa
3 jalepeno chicken sausages, chopped (i used TJs pre-cooked, so they only needed to be heated through. if you use uncooked sausage, remove casing and brown in a pan)
1/2 cup shredded cheese
chopped cilantro.


pre-heat oven to 375, flash boil peppers and cook rice. transfer rice to a mixing bowl and peppers to a plate and set aside.

chop up the tops of the bell peppers (not the stems).
melt butter and heat oil together in a heavy skillet over medium high heat.
add onions and chopped bell pepper. season with salt and saute for 3 minutes until softened.
add garlic and continue to cook for 1 minute.
add salsa and jalepeno chicken sausage and continue cooking for a minute or so to heat sausage through.
remove pan from heat and add sausage and onion mixture to rice and stir to combine. add cheese and mix untill cheese is melted.
scoop filling into hollowed out bell peppers and place on a baking sheet lined with foil and sprayed with pam.
bake for 30 minutes untill top is crispy.
sprinkle with chopped cilantro and serve.